A new blog, The R5, has launched over at therfive.blogspot.com. The name comes from a play off of the former name of the the Main Line, Philadelphia train (The R5) and the blogger's interest in five topics starting with R: Running, Reading, Retail, Restaurants and (Pet) Rescues.
There are only a few posts so far but it looks like a promising start!
Also, be sure to Follow The R5 on twitter!
Wednesday, March 5, 2014

Thursday, December 6, 2012
JanesNotes Published
Presenting JanesNotes, a new web site I put together to promote my Mother-In-Law's Private Piano Lesson business.
JanesNotes, by Jane O'Mara, offers private piano instruction to those in the greater Westmoreland County area.
Please feel free to swing by the site and let us know your thoughts with the contact form.
We're hoping an improved online-presence will lead to an increase in students. So if you or someone you know would like piano lessons, head on over to the site!
JanesNotes, by Jane O'Mara, offers private piano instruction to those in the greater Westmoreland County area.
Please feel free to swing by the site and let us know your thoughts with the contact form.
We're hoping an improved online-presence will lead to an increase in students. So if you or someone you know would like piano lessons, head on over to the site!
Tuesday, August 7, 2012
Air Canada Nightmare in Naples Airport
My wife and I had just spent a lovely honeymoon in Italy. We visited Rome, seeing the Coliseum, the Roman Forum, the Spanish Steps, the Pantheon, the Trevi Fountain, and the Vatican. After Rome, we toured Pompeii and then made our way to Sorrento. From Sorrento we visited Capri, hung out by the pool, and swam in the Mediterranean. All along the way we enjoyed great food, excellent wine, good shopping, and friendly people. The last night of our trip we stayed in Naples since we would be departing from Naples Airport early the next morning. And that's where our real adventure began...
Our taxi picked us up early in the morning at our hotel to bring us to the airport. Upon arriving at the airport we realized we had made a mistake. Apparently I had read the departure time on our tickets incorrectly and as a result our flight was already boarding. Our flight was booked through Air Canada but operated by Lufthansa. So we rushed to the Lufthansa desk to see if we could still make the flight. They showed very little interest in helping us, told us that basically we were out of luck and that we should go talk to the ticket office, despite the plane not leaving for another 20 minutes.
Unlike most airports I have ever been to, Naples Airport features a single desk with two windows for all the airlines present. After rushing to the ticket office, we were told by the very surly employee that Lufthansa could not help us because our ticket was not booked through them. Instead, it was booked through Air Canada, who did not have a presence in Naples. Therefore, the lady was not able to access their system and could do nothing for us.
With panic starting to set in, we made a quick call to my wife's parents at 12:30 AM EST, asking them to get online to talk with us on gchat since our pre-paid phones were almost out of minutes. We then discovered that wifi at the Naples airport costs a staggering 25 Euro for the day. But at that point, we had no choice. I also made a quick call to my mom asking her to get online as well. After a brief conversation with our parents, my wife's father called into Air Canada's help line. Unfortunately, after being on hold for over 30 minutes, his cell phone dropped the call. He then called again from a land-line and proceeded to wait on hold for a second time. Meanwhile, my mom also dialed into the helpline, hoping to increase our chances of getting a hold of someone.
Over 45 minutes later, my father-in-law finally got through to a man at Air Canada named 'Darla'. He explained the situation but was very surprised when they seemed completely uninterested in helping us what so ever. They told him that it was our fault that we missed the flight and therefore they were under no obligation to help. My father-in-law pressed on asking to speak to a supervisor, who basically repeated the same thing. When asked what they expected us to do, Air Canada's help desk replied with (paraphrasing): "Look, it's not that bad. They could be fighting a war in Afghanistan." Stunned by this response, my father-in-law kept pressing for more information. He was finally able to learn that this was the only Air Canada flight out of Naples and that the same flight was booked for at least the next two days. After getting nowhere, he finally hung up and it was my mom's turn to talk to Air Canada.
Interestingly, she reached the same Customer Service representative "Darla". Apparently Air Canada only employs one rep and one supervisor for the night-time shift, which would explain the extremely long hold times. She was told by Air Canada's representative that he had already spoken to my father-in-law and that there was nothing they could do. My mom told Darla that she was not asking for a "favor" or for him to do something for free, but that she needed Air Canada's assistance to get two of their customers who were stranded in Naples, Italy. She told Darla that she was willing to pay a change fee to switch us to a different flight and to pay an upgrade fee if the flight was full to get us into first or business class. Darla was not interested in that solution. She then asked Darla to speak to a supervisor. Darla refused, saying "He's sitting right here and he'll tell you the same thing." She told Darla that may be true, but she wanted to speak to him nevertheless. The supervisor, Tony, finally got on the phone. He said that my wife and I should be calling, not our parents. This may be true, but my mom reminded him that we only had an international cell phone with us for emergencies and that phone charges a lot per minute. She also pointed out that she had waited on hold for 45 minutes and we would not have had the battery life to make that call and it would have cost us a fortune for that many minutes just to be told they were unwilling to help.
Still persisting, my mom asked them what they expected us to do in this situation and how they would feel if it were their children stuck in a foreign country? To that, they replied that we had two options (again paraphrasing): "Tell them to go buy a ticket on Expedia with Air France or another airline. Or they can stay in Italy."
The fact that Air Canada refused to offer any help, even when we offered to pay them more money to have our tickets changed or upgraded, was astonishing. They even suggested taking our business to another airline!
While our parents were on the phone, I had called our travel agent in the States who said she would also call Air Canada. She again reached the same representative who told her that they had already spoken to my father-in-law and my mother and that there was nothing they could do. Additionally, she was able to learn that Air Canada and Lufthansa were no longer partners and therefore booking new flights would be difficult. Furthermore, our flights were booked with travel agent codes so even if they wanted to do something, which they clearly didn't, they couldn't. Our travel agent explained it was she who had booked the flights (through a 3rd party ticket-buyer) but the representative said that our only chance was if the company that actually booked the tickets were to call and negotiate a change.
The third-party ticket buyer wouldn't be open until 10AM EST, which was still another 8 or 9 hours away. I spoke with our travel agent again who basically said that while she thought there was a chance the company could get our tickets changed (for a fee), we wouldn't know until later tonight or tomorrow at the earliest. And even if they were able to get it changed, we may not be able to fly out for several days after that due to flight availability.
This back-and-forth with our parents, the travel agent and Air Canada went on for several hours. During which time, our laptop battery started running very low. We asked the Information Desk if there were plugs in the area, to which they replied "No. The only plugs are inside of security". Luckily, one of the ladies at the Information Desk took pity on us and said we could plug in behind their desk. This led to us standing at the Information Desk with our laptop out for almost 4 hours... While standing there, however, a lady came up to the desk in panic saying that her purse and belongings had been stolen. The desk seemed fairly unconcerned by this, which made us more concerned!
Once the phone calls were over, we talked it over with our parents online. We knew that if we kept trying with Air Canada, the best-case scenario would have us in Naples for at least two more days while we tried to negotiate flight changes and find one that wasn't full. Additionally, we had boarded our pet at home and had a car in the shop; so we really needed to get home. Therefore, we decided to take Air Canada's advice and buy tickets through another airline.
As you can imagine, last-minute, one-way, international flights from Naples, Italy to Philadelphia were not cheap (almost $2000 each!). The flights we selected would leave Naples around 5pm (keep in mind we arrived at the airport before 6am) and had stops in Munich and Manchester (UK) before arriving in Philadelphia on Saturday afternoon; almost 24 hours after our original arrival time. The three flights were on different airlines (Lufthansa, Singapore Air, and US Air).
At this point it was about 10AM local time in Italy (4AM in the States), so we told our parents go to bed and went to check in with the Lufthansa desk. When we got there, the same ladies who were so unhelpful when we first arrived were still there. We showed them our new itinerary that we had written down and were told we could check in but they were only able to print our boarding passes for our first two flights and that we would have to check in at the gate in Manchester to get our last boarding pass. Additionally, they could only check our bags through to Munich since our flights from Munich and Manchester were too far in the future (tomorrow). They said that once we arrived in Munich we would have to go out through customs, retrieve our bags, and then recheck them at the desk.
Once they told us they couldn't check our bags through to Philadelphia, they could see the level of exasperation and frustration on our faces and finally started to become more helpful. The told us if we came back at 1:30PM they would try to check our bags all the way through to Philadelphia. They also said we should go back to the ticket office, which now had a 45 minute line, and print out our itinerary so they could see all of our flight times and numbers.
After getting our itinerary, my wife and I found a nice spot on the wall to sit and wait for three more hours (apparently they don't have chairs in public places in Italy). This quickly turned into a frightening prospect, however, as we saw numerous drug-addicts and pick-pockets combing the crowd. Several of them came very close and gave us nasty stares since they could sense we were watching them. They were particularly interested in any young women travelling alone. We watched as one stood in line at the ticket office behind a family with their bags on a cart. He was obviously waiting for his opportunity to snatch her purse, which was also on the cart. But became frustrated when the father of the family never looked away. Twenty minutes later, he was right back in the same line behind a young lady with a large purse who was travelling alone. At that point, we decided to move closer to the check-in desk, which seemed to have less traffic and fewer pick-pockets.
One Thirty finally rolled around and surprisingly they were able to check our bags through to Philadelphia. We proceeded to go through security and wait at the gate for our flight to leave.
My wife and I arrived in Munich around 7:30pm local time and decided to get some dinner and have a couple German beers. Our connection was not until 6:30am the next morning and we had nowhere to go until then. To our surprise, the airport started to completely close down around 9:30pm. By 10 o'clock, everything in the airport was closed. We couldn't even find a vending machine to buy a bottle of water. Eventually, we did find a security guard and asked him if there was anywhere still open or if we were stuck there overnight. He told us that while nothing in the terminal was open, there were places open just outside of security.
We were originally reluctant to go through security, not knowing how safe the area was (especially after our Naples experience) or what time customs opened in the morning. But the guard explained that the area around the airport was very safe and that customs would be open in plenty of time for our flight in the morning. Taking his advice, we went through passport control and exited the airport. We were very surprised to find a lively, semi-covered outdoor plaza with several shops and restaurants still open. After walking around for a bit, we sat down at what turned out to be the largest, outdoor beer garden in the world (according to them). The place was very nice and had an excellent selection of German beers.
The beer garden closed around 1AM in the morning and we walked across the plaza to a 24-hour McDonalds, which had one free hour of wifi. This kept us entertained until a little after 2AM but unfortunately the airport wouldn't reopen the ticket lines to check in until around 4:30. Those two and a half hours were brutal. We were exhausted but didn't want to fall asleep in a strange city with our carry-on luggage and risk getting robbed or missing our flight in the morning. We managed to stay awake, check into our flight and make it through security in time to board our plane to Manchester, UK.
If you've never connected on an international flight in Manchester, it's a bit of an odd experience. You arrive in one Terminal, are then bused to another Terminal to go back through security, and finally bused back to the original Terminal for your connecting flight. Unfortunately, the Lufthansa people at Naples Airport were only able to print our boarding passes for our first two flights (we didn't even have seat numbers). But since you have to go back through security for connections in Manchester, it turned out to be a bit tricky without boarding passes. We had to try to go through security with our passports and our itinerary (printed in Italian). This caused quite a bit of confusion for the folks in Manchester. But eventually, they sent us to a customer service desk where a very nice US Air representative helped us get checked into the flight, get seats together, and even got us a good zone number so we could board early. He even walked us down to the bus and made sure we go to the right Terminal.
After a couple hours in Manchester, we finally boarded our last flight home to Philadelphia. My wife and I slept virtually the entire way after not sleeping for over 24 hours. The total time from when we got to the Naples Airport to when we arrived at Philadelphia Airport was approximately 38 hours. The whole thing was one of the most frustrating and exhausting experiences of our lives and we were so happy to make it home safely.
We are so thankful to our parents for all of their help throughout this ordeal!
I should also point out that while there were several people involved in this process that were EXTREMELY unhelpful (and often downright rude and disrespectful), there were also several people who went out of their way to aid us in our journey: the lady at the Information Desk in Naples, the nice couple from Penn State we met while waiting for our flight, the security guard at Munich Airport, the US Air representative at Manchester Airport, and our driver who brought us home from the Philadelphia Airport. We'd like to thank all of your for being so kind and helpful on a day (or days) when so much else was going wrong!
Our taxi picked us up early in the morning at our hotel to bring us to the airport. Upon arriving at the airport we realized we had made a mistake. Apparently I had read the departure time on our tickets incorrectly and as a result our flight was already boarding. Our flight was booked through Air Canada but operated by Lufthansa. So we rushed to the Lufthansa desk to see if we could still make the flight. They showed very little interest in helping us, told us that basically we were out of luck and that we should go talk to the ticket office, despite the plane not leaving for another 20 minutes.
Unlike most airports I have ever been to, Naples Airport features a single desk with two windows for all the airlines present. After rushing to the ticket office, we were told by the very surly employee that Lufthansa could not help us because our ticket was not booked through them. Instead, it was booked through Air Canada, who did not have a presence in Naples. Therefore, the lady was not able to access their system and could do nothing for us.
With panic starting to set in, we made a quick call to my wife's parents at 12:30 AM EST, asking them to get online to talk with us on gchat since our pre-paid phones were almost out of minutes. We then discovered that wifi at the Naples airport costs a staggering 25 Euro for the day. But at that point, we had no choice. I also made a quick call to my mom asking her to get online as well. After a brief conversation with our parents, my wife's father called into Air Canada's help line. Unfortunately, after being on hold for over 30 minutes, his cell phone dropped the call. He then called again from a land-line and proceeded to wait on hold for a second time. Meanwhile, my mom also dialed into the helpline, hoping to increase our chances of getting a hold of someone.
Over 45 minutes later, my father-in-law finally got through to a man at Air Canada named 'Darla'. He explained the situation but was very surprised when they seemed completely uninterested in helping us what so ever. They told him that it was our fault that we missed the flight and therefore they were under no obligation to help. My father-in-law pressed on asking to speak to a supervisor, who basically repeated the same thing. When asked what they expected us to do, Air Canada's help desk replied with (paraphrasing): "Look, it's not that bad. They could be fighting a war in Afghanistan." Stunned by this response, my father-in-law kept pressing for more information. He was finally able to learn that this was the only Air Canada flight out of Naples and that the same flight was booked for at least the next two days. After getting nowhere, he finally hung up and it was my mom's turn to talk to Air Canada.
Interestingly, she reached the same Customer Service representative "Darla". Apparently Air Canada only employs one rep and one supervisor for the night-time shift, which would explain the extremely long hold times. She was told by Air Canada's representative that he had already spoken to my father-in-law and that there was nothing they could do. My mom told Darla that she was not asking for a "favor" or for him to do something for free, but that she needed Air Canada's assistance to get two of their customers who were stranded in Naples, Italy. She told Darla that she was willing to pay a change fee to switch us to a different flight and to pay an upgrade fee if the flight was full to get us into first or business class. Darla was not interested in that solution. She then asked Darla to speak to a supervisor. Darla refused, saying "He's sitting right here and he'll tell you the same thing." She told Darla that may be true, but she wanted to speak to him nevertheless. The supervisor, Tony, finally got on the phone. He said that my wife and I should be calling, not our parents. This may be true, but my mom reminded him that we only had an international cell phone with us for emergencies and that phone charges a lot per minute. She also pointed out that she had waited on hold for 45 minutes and we would not have had the battery life to make that call and it would have cost us a fortune for that many minutes just to be told they were unwilling to help.
Still persisting, my mom asked them what they expected us to do in this situation and how they would feel if it were their children stuck in a foreign country? To that, they replied that we had two options (again paraphrasing): "Tell them to go buy a ticket on Expedia with Air France or another airline. Or they can stay in Italy."
The fact that Air Canada refused to offer any help, even when we offered to pay them more money to have our tickets changed or upgraded, was astonishing. They even suggested taking our business to another airline!
While our parents were on the phone, I had called our travel agent in the States who said she would also call Air Canada. She again reached the same representative who told her that they had already spoken to my father-in-law and my mother and that there was nothing they could do. Additionally, she was able to learn that Air Canada and Lufthansa were no longer partners and therefore booking new flights would be difficult. Furthermore, our flights were booked with travel agent codes so even if they wanted to do something, which they clearly didn't, they couldn't. Our travel agent explained it was she who had booked the flights (through a 3rd party ticket-buyer) but the representative said that our only chance was if the company that actually booked the tickets were to call and negotiate a change.
The third-party ticket buyer wouldn't be open until 10AM EST, which was still another 8 or 9 hours away. I spoke with our travel agent again who basically said that while she thought there was a chance the company could get our tickets changed (for a fee), we wouldn't know until later tonight or tomorrow at the earliest. And even if they were able to get it changed, we may not be able to fly out for several days after that due to flight availability.
This back-and-forth with our parents, the travel agent and Air Canada went on for several hours. During which time, our laptop battery started running very low. We asked the Information Desk if there were plugs in the area, to which they replied "No. The only plugs are inside of security". Luckily, one of the ladies at the Information Desk took pity on us and said we could plug in behind their desk. This led to us standing at the Information Desk with our laptop out for almost 4 hours... While standing there, however, a lady came up to the desk in panic saying that her purse and belongings had been stolen. The desk seemed fairly unconcerned by this, which made us more concerned!
Once the phone calls were over, we talked it over with our parents online. We knew that if we kept trying with Air Canada, the best-case scenario would have us in Naples for at least two more days while we tried to negotiate flight changes and find one that wasn't full. Additionally, we had boarded our pet at home and had a car in the shop; so we really needed to get home. Therefore, we decided to take Air Canada's advice and buy tickets through another airline.
As you can imagine, last-minute, one-way, international flights from Naples, Italy to Philadelphia were not cheap (almost $2000 each!). The flights we selected would leave Naples around 5pm (keep in mind we arrived at the airport before 6am) and had stops in Munich and Manchester (UK) before arriving in Philadelphia on Saturday afternoon; almost 24 hours after our original arrival time. The three flights were on different airlines (Lufthansa, Singapore Air, and US Air).
At this point it was about 10AM local time in Italy (4AM in the States), so we told our parents go to bed and went to check in with the Lufthansa desk. When we got there, the same ladies who were so unhelpful when we first arrived were still there. We showed them our new itinerary that we had written down and were told we could check in but they were only able to print our boarding passes for our first two flights and that we would have to check in at the gate in Manchester to get our last boarding pass. Additionally, they could only check our bags through to Munich since our flights from Munich and Manchester were too far in the future (tomorrow). They said that once we arrived in Munich we would have to go out through customs, retrieve our bags, and then recheck them at the desk.
Once they told us they couldn't check our bags through to Philadelphia, they could see the level of exasperation and frustration on our faces and finally started to become more helpful. The told us if we came back at 1:30PM they would try to check our bags all the way through to Philadelphia. They also said we should go back to the ticket office, which now had a 45 minute line, and print out our itinerary so they could see all of our flight times and numbers.
After getting our itinerary, my wife and I found a nice spot on the wall to sit and wait for three more hours (apparently they don't have chairs in public places in Italy). This quickly turned into a frightening prospect, however, as we saw numerous drug-addicts and pick-pockets combing the crowd. Several of them came very close and gave us nasty stares since they could sense we were watching them. They were particularly interested in any young women travelling alone. We watched as one stood in line at the ticket office behind a family with their bags on a cart. He was obviously waiting for his opportunity to snatch her purse, which was also on the cart. But became frustrated when the father of the family never looked away. Twenty minutes later, he was right back in the same line behind a young lady with a large purse who was travelling alone. At that point, we decided to move closer to the check-in desk, which seemed to have less traffic and fewer pick-pockets.
One Thirty finally rolled around and surprisingly they were able to check our bags through to Philadelphia. We proceeded to go through security and wait at the gate for our flight to leave.
My wife and I arrived in Munich around 7:30pm local time and decided to get some dinner and have a couple German beers. Our connection was not until 6:30am the next morning and we had nowhere to go until then. To our surprise, the airport started to completely close down around 9:30pm. By 10 o'clock, everything in the airport was closed. We couldn't even find a vending machine to buy a bottle of water. Eventually, we did find a security guard and asked him if there was anywhere still open or if we were stuck there overnight. He told us that while nothing in the terminal was open, there were places open just outside of security.
We were originally reluctant to go through security, not knowing how safe the area was (especially after our Naples experience) or what time customs opened in the morning. But the guard explained that the area around the airport was very safe and that customs would be open in plenty of time for our flight in the morning. Taking his advice, we went through passport control and exited the airport. We were very surprised to find a lively, semi-covered outdoor plaza with several shops and restaurants still open. After walking around for a bit, we sat down at what turned out to be the largest, outdoor beer garden in the world (according to them). The place was very nice and had an excellent selection of German beers.
The beer garden closed around 1AM in the morning and we walked across the plaza to a 24-hour McDonalds, which had one free hour of wifi. This kept us entertained until a little after 2AM but unfortunately the airport wouldn't reopen the ticket lines to check in until around 4:30. Those two and a half hours were brutal. We were exhausted but didn't want to fall asleep in a strange city with our carry-on luggage and risk getting robbed or missing our flight in the morning. We managed to stay awake, check into our flight and make it through security in time to board our plane to Manchester, UK.
If you've never connected on an international flight in Manchester, it's a bit of an odd experience. You arrive in one Terminal, are then bused to another Terminal to go back through security, and finally bused back to the original Terminal for your connecting flight. Unfortunately, the Lufthansa people at Naples Airport were only able to print our boarding passes for our first two flights (we didn't even have seat numbers). But since you have to go back through security for connections in Manchester, it turned out to be a bit tricky without boarding passes. We had to try to go through security with our passports and our itinerary (printed in Italian). This caused quite a bit of confusion for the folks in Manchester. But eventually, they sent us to a customer service desk where a very nice US Air representative helped us get checked into the flight, get seats together, and even got us a good zone number so we could board early. He even walked us down to the bus and made sure we go to the right Terminal.
After a couple hours in Manchester, we finally boarded our last flight home to Philadelphia. My wife and I slept virtually the entire way after not sleeping for over 24 hours. The total time from when we got to the Naples Airport to when we arrived at Philadelphia Airport was approximately 38 hours. The whole thing was one of the most frustrating and exhausting experiences of our lives and we were so happy to make it home safely.
We are so thankful to our parents for all of their help throughout this ordeal!
I should also point out that while there were several people involved in this process that were EXTREMELY unhelpful (and often downright rude and disrespectful), there were also several people who went out of their way to aid us in our journey: the lady at the Information Desk in Naples, the nice couple from Penn State we met while waiting for our flight, the security guard at Munich Airport, the US Air representative at Manchester Airport, and our driver who brought us home from the Philadelphia Airport. We'd like to thank all of your for being so kind and helpful on a day (or days) when so much else was going wrong!
Thursday, January 15, 2009
Save Google Notebook!
I just learned today that Google plans to stop development on Google Nootbook and after next week will no longer be accepting new sign-ups. This is terrible! Notebook has been such a useful service for me for a long time and I'd hate to see it get faded out. I use Notebook for everyday lists, notes, thoughts, reminders, interesting tid-bits I find on the web, and even share notes with friends.
They are saying the service will remain active for the time being but closing new sign-ups will surely doom the product and force them to shut it down eventually.
From Google's Blog:
They then go on to suggest other products at Google that have similar bits and pieces of functionality as Notebook... but none of them will do what I currently use Notebook for.
They are saying the service will remain active for the time being but closing new sign-ups will surely doom the product and force them to shut it down eventually.
From Google's Blog:
At Google, we're constantly working to innovate and improve our products so people can easily find and manage information. At times though, we have to decide where to focus our efforts and which technologies we expect will yield the most benefit to users in the long run.
Starting next week, we plan to stop active development on Google Notebook. This means we'll no longer be adding features or offer Notebook for new users. But don't fret, we'll continue to maintain service for those of you who've already signed up. As part of this plan, however, we will no longer support the Notebook Extension, but as always users who have already signed up will continue to have access to their data via the web interface at http://www.google.com/notebook.
They then go on to suggest other products at Google that have similar bits and pieces of functionality as Notebook... but none of them will do what I currently use Notebook for.
Saturday, August 23, 2008
Grub Error 24: Attempt to access block outside partition
I made a few mistakes on my media box playing around with packages that had more dependencies than I originally thought... At any rate, I decided it would make more sense to just reinstall and start fresh than to try and pick up the pieces. After going through the reinstall, formatting my OS hard drive and installing Ubuntu, it asked for a reboot. When it restarted, I hit the following Grub error:
Error 24: Attempt to access block outside partition
After doing a ton of searching online, I finally figured out that this was a problem with my menu.lst file that Grub uses to boot. In my case, it was attempting to boot off the wrong HD with the line:
boot (hd4,0)
To correct this, I had to do a temporary and then a permanent fix. The temporary fix is needed to get Ubuntu to boot at all, and because I wasn't able to figure out an effective way to edit the menu.lst file without being able to boot into Ubuntu in the first place...
So, for the temporary fix, when you start (or reboot) your computer, wait for the Grub loading stage and hit escape to interrupt the countdown (usually 3 seconds by default) and enter the grub menu.
Once in the Grub menu, hit 'e' to begin editing. Look for the line that starts with 'boot' and make sure it's set to 'boot (hd0,0)'. If it's not, go down to that line if you're not already on it and hit 'e' to edit that line. Change 'hdX' (where X is any number NOT 0) to 'hd0' and hit enter to accept the change. Then hit 'b' to boot with those settings.
*NOTE* If your boot line was set to (hd0,0), check here for other alternatives.
Once you've done this, you should be able to boot Ubuntu. Now you need to make sure you don't have to do this every time! To do this...
Open a terminal and type:
'sudo vi /boot/grub/menu.lst'
This will open your menu.lst file for editing. (If you're not used to editing in vi, you can also try gedit by typing 'gksudo gedit /boot/grub/menu.lst')
In either case, once you have the file open, navigate down past all the commented lines (lines starting with '#') towards the bottom of the file. There you'll see three sections, one to load Ubuntu, one to load Ubuntu in recovery mode, and one to run the Ubuntu memtest. In all three of these sections, there's a line similar to:
root (hdX,0)
In all three sections, edit this line to be:
root (hd0,0)
This will ensure that Grub boots off the right device from now on!
Good luck!
Error 24: Attempt to access block outside partition
After doing a ton of searching online, I finally figured out that this was a problem with my menu.lst file that Grub uses to boot. In my case, it was attempting to boot off the wrong HD with the line:
boot (hd4,0)
To correct this, I had to do a temporary and then a permanent fix. The temporary fix is needed to get Ubuntu to boot at all, and because I wasn't able to figure out an effective way to edit the menu.lst file without being able to boot into Ubuntu in the first place...
So, for the temporary fix, when you start (or reboot) your computer, wait for the Grub loading stage and hit escape to interrupt the countdown (usually 3 seconds by default) and enter the grub menu.
Once in the Grub menu, hit 'e' to begin editing. Look for the line that starts with 'boot' and make sure it's set to 'boot (hd0,0)'. If it's not, go down to that line if you're not already on it and hit 'e' to edit that line. Change 'hdX' (where X is any number NOT 0) to 'hd0' and hit enter to accept the change. Then hit 'b' to boot with those settings.
*NOTE* If your boot line was set to (hd0,0), check here for other alternatives.
Once you've done this, you should be able to boot Ubuntu. Now you need to make sure you don't have to do this every time! To do this...
Open a terminal and type:
'sudo vi /boot/grub/menu.lst'
This will open your menu.lst file for editing. (If you're not used to editing in vi, you can also try gedit by typing 'gksudo gedit /boot/grub/menu.lst')
In either case, once you have the file open, navigate down past all the commented lines (lines starting with '#') towards the bottom of the file. There you'll see three sections, one to load Ubuntu, one to load Ubuntu in recovery mode, and one to run the Ubuntu memtest. In all three of these sections, there's a line similar to:
root (hdX,0)
In all three sections, edit this line to be:
root (hd0,0)
This will ensure that Grub boots off the right device from now on!
Good luck!
Thursday, July 24, 2008
Elisa - Updated LIRC Info
I thought it might also be useful to post the direct mappings that I'm using (so you don't have to fish through my LIRCrc file).
Here is a list of button mappings I'm using that are working:
The following bindings no longer work (since v.0.3.1). I'd like to find out the new bindings (or find out if these are going to be fixed).
And lastly, I'd like to find out the mappings (or would like to see them created) for the following functionality:
Fastforward / Rewind (not seek/jump)
Jump to playing media (when in the menu's and media is playing, return to the playing media from anywhere)
Jump to home-screen (jump to the home menu screen from anywhere in the menus)
Next/Previous song or media item in playlist or folder (currently I have to seek forward to get to the next song)
Randomize playlist / folder list for playback
Next Visualization (Jump to the next visualization when songs are playing)
Page Up/Down (in menus - to allow faster scrolling of long media lists)
Jump to Top / Bottom of List (again in menus)
I'm sure there are more for this last list that I'm not thinking of... but that's a good starting point. If you know the mappings for any of these, please share! Like I said in my previous post, I'm willing to put together the LIRC documentation if I can get my hands on all the information.
Perhaps some of this will change with the upcoming 0.5.1 release as well. I'll do some testing when the Ubuntu deb's come out and report my findings.
Here is a list of button mappings I'm using that are working:
| Functionality | Action_Binding |
| OK/Select/Toggle-Play-Pause | activate_key |
| Stop | stop_key |
| Move Up (in menu) | move_up_key |
| Move Down (in menu) | move_down_key |
| Move Right (in menu) | move_right_key |
| Move Left (in menu) | move_left_key |
| Back/Previous Screen (in menu) | toggle_menu_key |
| Mute | toggle_mute_key |
| Volume Up | increment_volume_key |
| Volume Down | decrement_volume_key |
| Jump/Seek Backward | seek_backward_key |
| Jump/Seek Forward | seek_forward_key |
| Toggle Fullscreen Mode | toggle_fullscreen_key |
| Close Elisa | close_key |
The following bindings no longer work (since v.0.3.1). I'd like to find out the new bindings (or find out if these are going to be fixed).
| Functionality | Action_Binding |
| Toggle Play / Pause | toggle_play_pause_key |
| Pause | pause_key |
And lastly, I'd like to find out the mappings (or would like to see them created) for the following functionality:
Fastforward / Rewind (not seek/jump)
Jump to playing media (when in the menu's and media is playing, return to the playing media from anywhere)
Jump to home-screen (jump to the home menu screen from anywhere in the menus)
Next/Previous song or media item in playlist or folder (currently I have to seek forward to get to the next song)
Randomize playlist / folder list for playback
Next Visualization (Jump to the next visualization when songs are playing)
Page Up/Down (in menus - to allow faster scrolling of long media lists)
Jump to Top / Bottom of List (again in menus)
I'm sure there are more for this last list that I'm not thinking of... but that's a good starting point. If you know the mappings for any of these, please share! Like I said in my previous post, I'm willing to put together the LIRC documentation if I can get my hands on all the information.
Perhaps some of this will change with the upcoming 0.5.1 release as well. I'll do some testing when the Ubuntu deb's come out and report my findings.
Monday, April 21, 2008
New Car
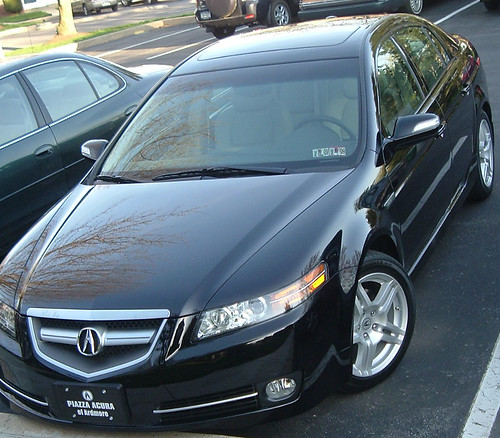
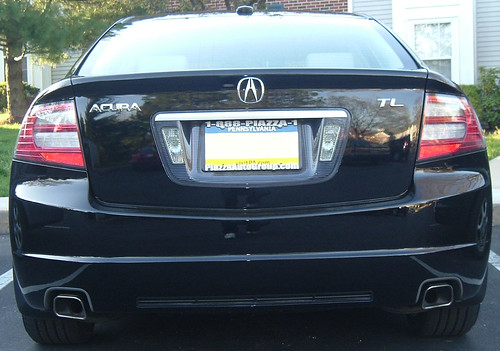
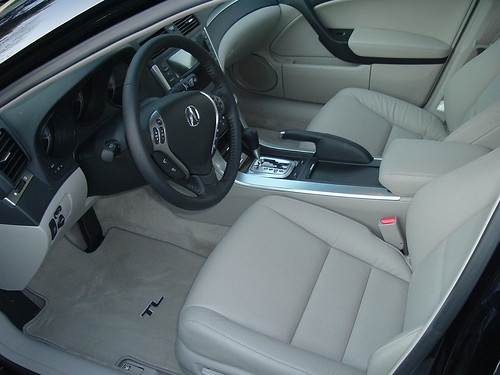
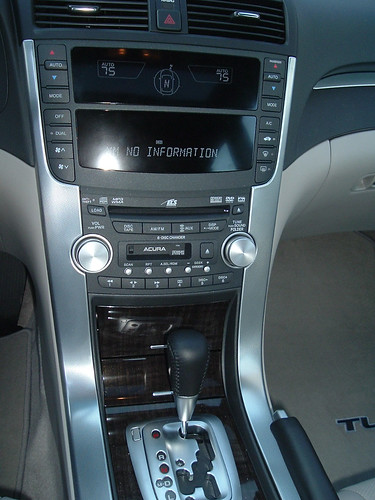
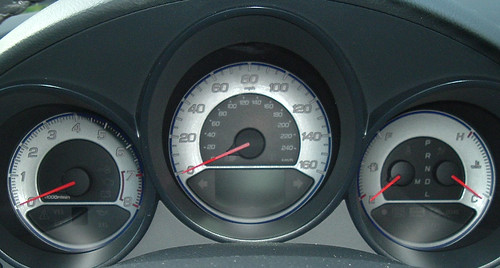
I just picked up a sweet new ride and thought I'd share some photos. The car is a black, 2008 Acura TL with taupe leather interior and sporting 258 hp.
Here are some pics:
From the front
From the back-side

The Back
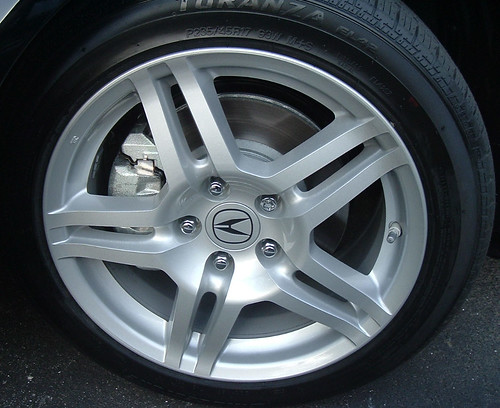
Check out the rims
Stepping into the car... wipe yo feet!
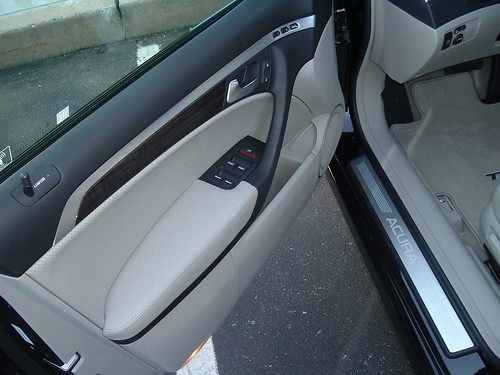
Interior shot
The Dash
Gauges (they look much better when the car's turned on - especially at night)
Here are some pics:
From the front
From the back-side
The Back
Check out the rims
Stepping into the car... wipe yo feet!
Interior shot
The Dash
Gauges (they look much better when the car's turned on - especially at night)
Saturday, March 1, 2008
Elisa LIRC RC FIle
I realized it may be useful for someone to see the LIRC rc file I generated for Elisa. The file was generated using the steps outlined in my tutorial, but I made some modifications to it.
Like I mentioned in the tutorial, the remote I used was the standard M$ media remote control & receiver ( can be found here ). The remote works great and is easy to configure / install.
However, I did notice that some of the buttons also interact with my xbox 360, which is the reason for some of the modifications I made to the file. Specifically, the Home and Power buttons turn on the 360.
So, I changed the action mapped to the Power button, which was to close Elisa and therefore was rarely used, to the More button. The action that was mapped to the Home button, which was to back up in the Elisa menus, was remapped to the Back button. Besides the fact that it interfered with the 360, I thought that button made more sense as well.
At any rate... here's the LIRC rc file (named elisa.lirc) that I used:
begin
remote = mceusb
prog = elisa
button = Play
config = toggle_play_pause_key
repeat = 0
delay = 0
end
begin
remote = mceusb
prog = elisa
button = Right
config = move_right_key
repeat = 0
delay = 0
end
begin
remote = mceusb
prog = elisa
button = OK
config = activate_key
repeat = 0
delay = 0
end
begin
remote = mceusb
prog = elisa
button = Clear
config = close_key
repeat = 0
delay = 0
end
begin
remote = mceusb
prog = elisa
button = Mute
config = toggle_mute_key
repeat = 0
delay = 0
end
begin
remote = mceusb
prog = elisa
button = VolDown
config = decrement_volume_key
repeat = 0
delay = 0
end
begin
remote = mceusb
prog = elisa
button = Rewind
config = seek_backward_key
repeat = 0
delay = 0
end
begin
remote = mceusb
prog = elisa
button = Stop
config = stop_key
repeat = 0
delay = 0
end
begin
remote = mceusb
prog = elisa
button = Up
config = move_up_key
repeat = 0
delay = 0
end
begin
remote = mceusb
prog = elisa
button = VolUp
config = increment_volume_key
repeat = 0
delay = 0
end
begin
remote = mceusb
prog = elisa
button = Down
config = move_down_key
repeat = 0
delay = 0
end
begin
remote = mceusb
prog = elisa
button = Pause
config = pause_key
repeat = 0
delay = 0
end
begin
remote = mceusb
prog = elisa
button = Enter
config = activate_key
repeat = 0
delay = 0
end
begin
remote = mceusb
prog = elisa
button = Forward
config = seek_forward_key
repeat = 0
delay = 0
end
begin
remote = mceusb
prog = elisa
button = Back
config = toggle_menu_key
repeat = 0
delay = 0
end
begin
remote = mceusb
prog = elisa
button = More
config = toggle_fullscreen_key
repeat = 0
delay = 0
end
begin
remote = mceusb
prog = elisa
button = Left
config = move_left_key
repeat = 0
delay = 0
end
Like I mentioned in the tutorial, the remote I used was the standard M$ media remote control & receiver ( can be found here ). The remote works great and is easy to configure / install.
However, I did notice that some of the buttons also interact with my xbox 360, which is the reason for some of the modifications I made to the file. Specifically, the Home and Power buttons turn on the 360.
So, I changed the action mapped to the Power button, which was to close Elisa and therefore was rarely used, to the More button. The action that was mapped to the Home button, which was to back up in the Elisa menus, was remapped to the Back button. Besides the fact that it interfered with the 360, I thought that button made more sense as well.
At any rate... here's the LIRC rc file (named elisa.lirc) that I used:
begin
remote = mceusb
prog = elisa
button = Play
config = toggle_play_pause_key
repeat = 0
delay = 0
end
begin
remote = mceusb
prog = elisa
button = Right
config = move_right_key
repeat = 0
delay = 0
end
begin
remote = mceusb
prog = elisa
button = OK
config = activate_key
repeat = 0
delay = 0
end
begin
remote = mceusb
prog = elisa
button = Clear
config = close_key
repeat = 0
delay = 0
end
begin
remote = mceusb
prog = elisa
button = Mute
config = toggle_mute_key
repeat = 0
delay = 0
end
begin
remote = mceusb
prog = elisa
button = VolDown
config = decrement_volume_key
repeat = 0
delay = 0
end
begin
remote = mceusb
prog = elisa
button = Rewind
config = seek_backward_key
repeat = 0
delay = 0
end
begin
remote = mceusb
prog = elisa
button = Stop
config = stop_key
repeat = 0
delay = 0
end
begin
remote = mceusb
prog = elisa
button = Up
config = move_up_key
repeat = 0
delay = 0
end
begin
remote = mceusb
prog = elisa
button = VolUp
config = increment_volume_key
repeat = 0
delay = 0
end
begin
remote = mceusb
prog = elisa
button = Down
config = move_down_key
repeat = 0
delay = 0
end
begin
remote = mceusb
prog = elisa
button = Pause
config = pause_key
repeat = 0
delay = 0
end
begin
remote = mceusb
prog = elisa
button = Enter
config = activate_key
repeat = 0
delay = 0
end
begin
remote = mceusb
prog = elisa
button = Forward
config = seek_forward_key
repeat = 0
delay = 0
end
begin
remote = mceusb
prog = elisa
button = Back
config = toggle_menu_key
repeat = 0
delay = 0
end
begin
remote = mceusb
prog = elisa
button = More
config = toggle_fullscreen_key
repeat = 0
delay = 0
end
begin
remote = mceusb
prog = elisa
button = Left
config = move_left_key
repeat = 0
delay = 0
end
Friday, February 29, 2008
Hardware Assembly and Installation
This section of the tutorial shows the steps I took to build the box itself.
As a side note, it's always a good idea to plug in the motherboard to the power supply before getting started and turning it on to ensure the motherboard isn't dead on arrival. You should hear a beep if its working correctly... moving on...
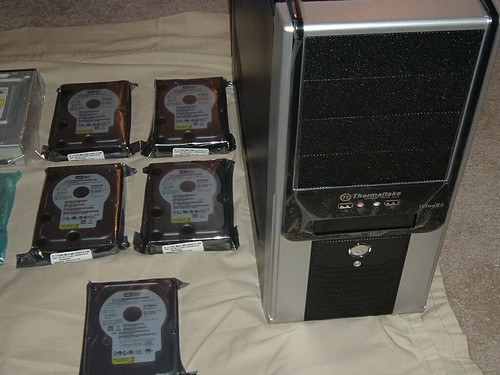
Below is a picture of all the hardware that went into the box. The list of this hardware is on the previous page.

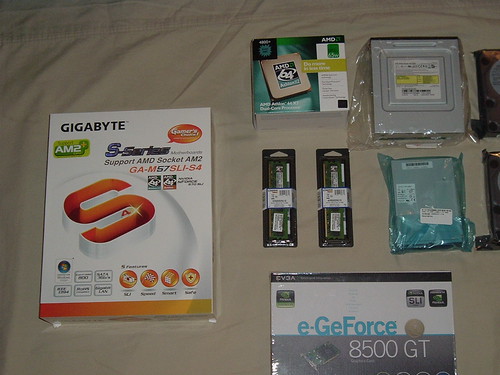
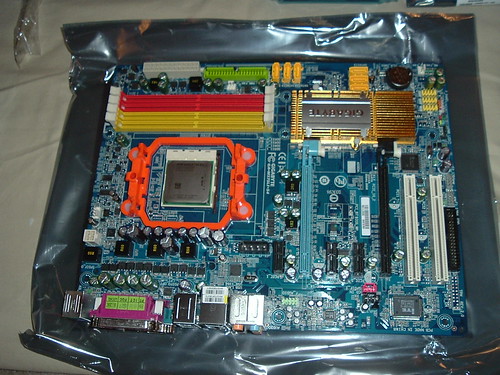
The first step was installing the processor on the motherboard. This is usually pretty simple to accomplish and usually just entails lining up the processor (making sure the symbol on the corner matches the symbol on the motherboard to ensure its oriented properly), and turning the lever to lock the processor down.
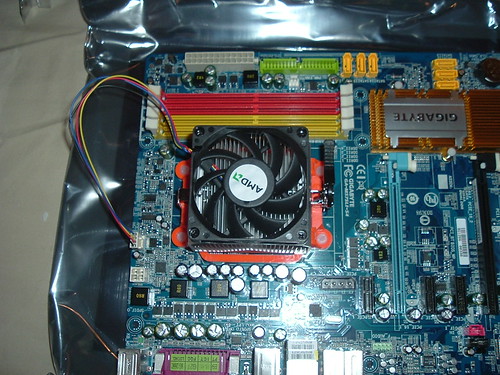
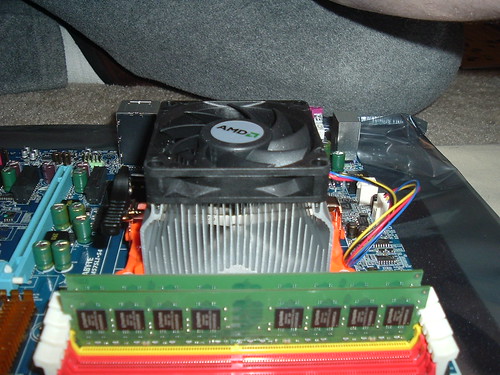
Next I added the fan onto the top of the processor. Some processor / fan combinations require using an insulating gel of some kind. This particular fan has a thermal pad on the bottom and does not require that anything be added between them. Lock the fan down by following the instructions that came with the processor and plug the fan in.
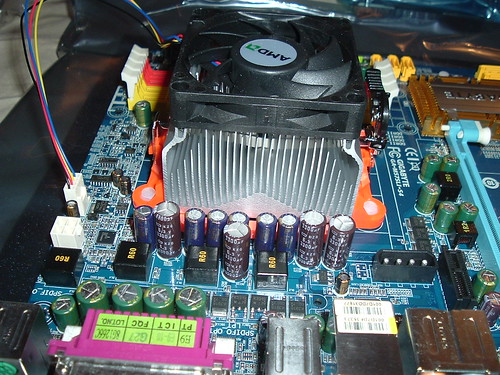
Once this is done, its time to add the RAM. This is pretty self-explanatory...
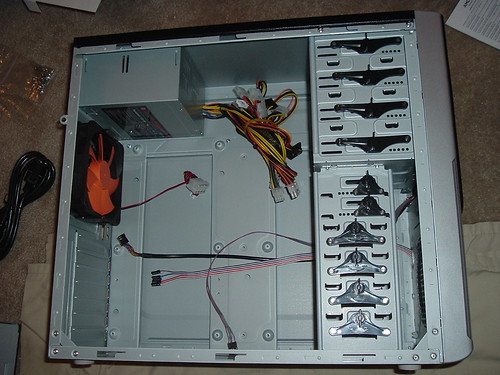
Now it's time to insert the motherboard into the case. Below is a picture of the case I'm using.
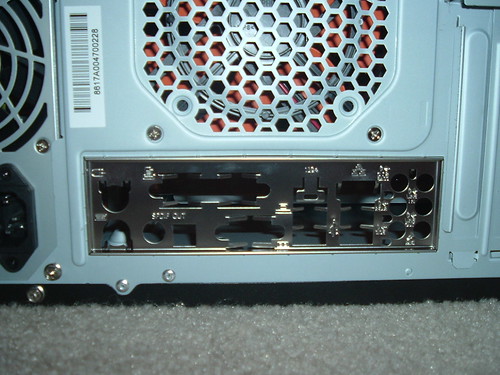
Before I inserted the motherboard, I first had to remove the I/O panel on the back of the case and insert the one that came with the motherboard.
Now that that's done, it's time to place the motherboard into the case and screw it down.
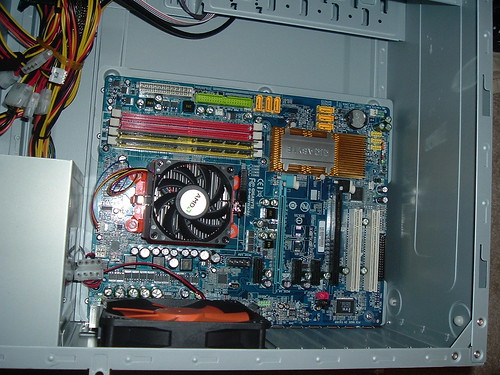
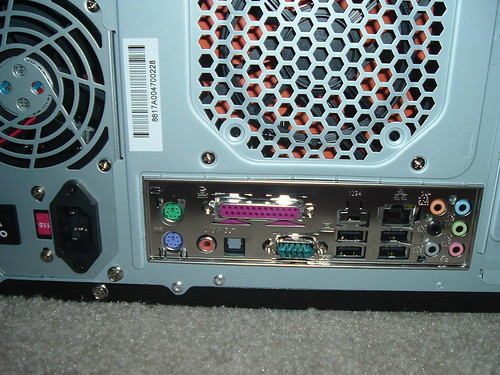
Now that the mobo's in... the real fun begins. The next thing I did was I installed the video card. They are pretty easy to install... just insert into the PCI slot (for PCI cards).
Here's a couple pics of the nvidia 8500GT before and after install.
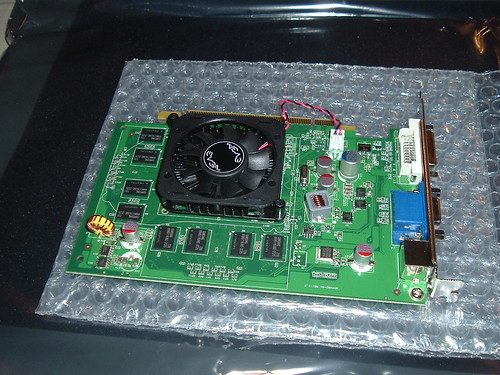
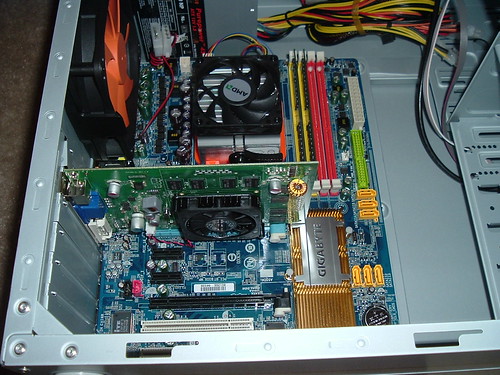
Next I installed the CD/DVD drive and the floppy drive. I popped off the front of the case and removed the panel-covers that were covering the slots for each. Then I inserted the drives and locked them into place. (on my case this is as simple as turning the locking handles. some cases make you screw them into place)
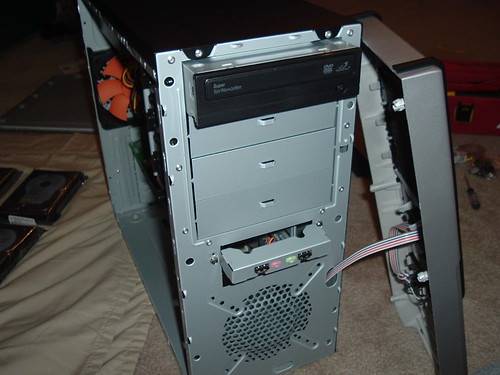
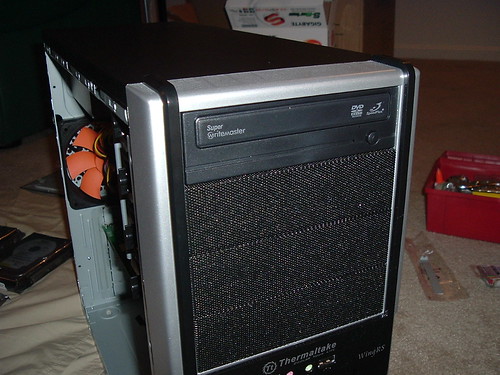
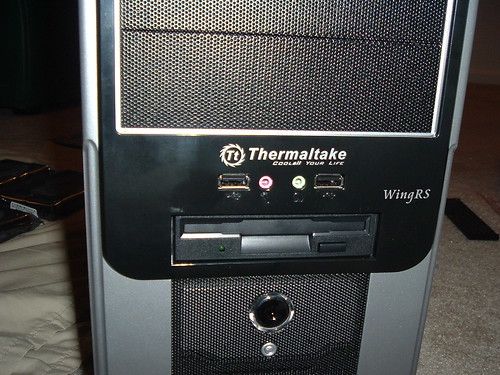
Once those are in, it's time to start inserting hard drives. As i described in the overview... I'm going to be installing one 160gb hard drive to hold the operating system and applications as well as four-500 gb hard drives that are going to be setup as a RAID array and used for file storage.
Here's a picture showing the hard drives placed in the case. (the top one I had to place in a slot not generally used for hard drives... it still worked fine though)
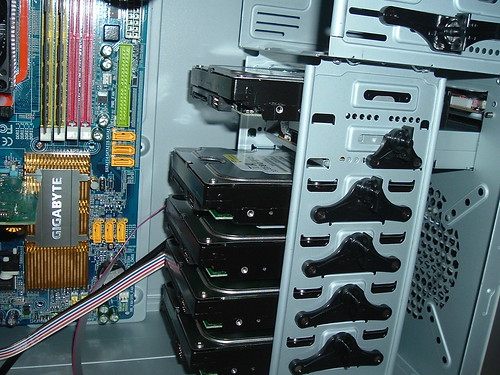
Now it's time to start on connections. I urge you to refer to your motherboard instructions for specific instructions on how to setup all the connections.
I first connected the cables leading to the front power-button, USB connections, and indicator LEDs. These generally go in / near the F_panel.
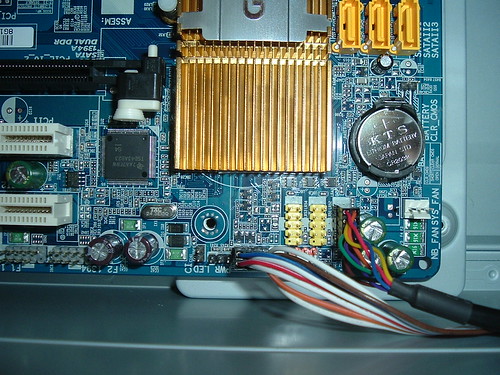
Then it was time to start connecting all the SATA (and my one non-SATA device, the floppy drive). The picture probably doesn't do this justice but it should be relatively self explanatory. Find your SATA ports on your motherboard and connect them to your various SATA devices (in my case the 5 hard drives and the CD/DVD drive) via SATA cables. As a side note... my motherboard only came with 4 SATA cables for the 6 SATA slots it has, so I had to pick up two additional cables.
I also connected power cables to all the various devices, including the hard drives, floppy and CD/DVD drives, motherboard and fan.
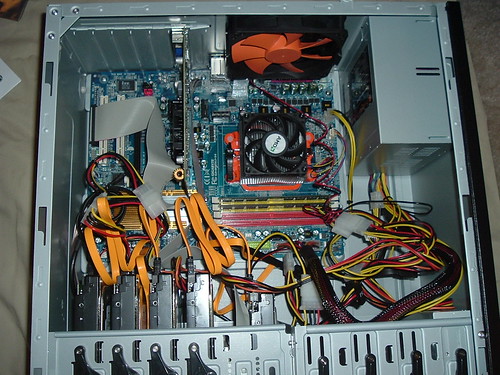
Once all your connections are established, you're ready to fire it up and test it out. I recommend leaving the case off for a bit because you'll need to go back in and unplug things later in this tutorial. Also if you messed up any of the connections, you can get back in faster to fix them.
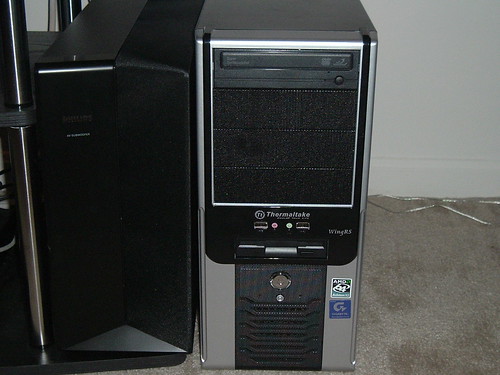
Here's a picture of the finished case sitting next to my sub woofer. (complete with stickers - though I'm still waiting on my ubuntu stickers)
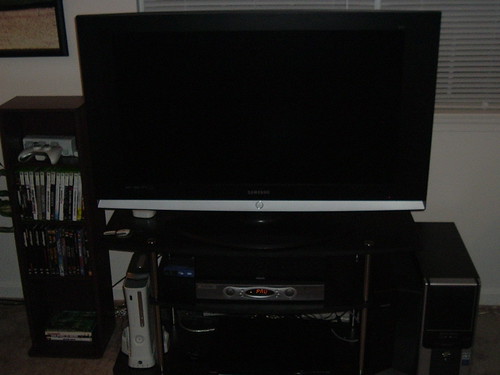
Here's a picture of my entertainment center with its latest addition (bottom right). Sorry it's kinda dark.
Continued: Operating System & Hard Drive Configuration
As a side note, it's always a good idea to plug in the motherboard to the power supply before getting started and turning it on to ensure the motherboard isn't dead on arrival. You should hear a beep if its working correctly... moving on...
Below is a picture of all the hardware that went into the box. The list of this hardware is on the previous page.
The first step was installing the processor on the motherboard. This is usually pretty simple to accomplish and usually just entails lining up the processor (making sure the symbol on the corner matches the symbol on the motherboard to ensure its oriented properly), and turning the lever to lock the processor down.
Next I added the fan onto the top of the processor. Some processor / fan combinations require using an insulating gel of some kind. This particular fan has a thermal pad on the bottom and does not require that anything be added between them. Lock the fan down by following the instructions that came with the processor and plug the fan in.
Once this is done, its time to add the RAM. This is pretty self-explanatory...
Now it's time to insert the motherboard into the case. Below is a picture of the case I'm using.
Before I inserted the motherboard, I first had to remove the I/O panel on the back of the case and insert the one that came with the motherboard.
Now that that's done, it's time to place the motherboard into the case and screw it down.
Now that the mobo's in... the real fun begins. The next thing I did was I installed the video card. They are pretty easy to install... just insert into the PCI slot (for PCI cards).
Here's a couple pics of the nvidia 8500GT before and after install.
Next I installed the CD/DVD drive and the floppy drive. I popped off the front of the case and removed the panel-covers that were covering the slots for each. Then I inserted the drives and locked them into place. (on my case this is as simple as turning the locking handles. some cases make you screw them into place)
Once those are in, it's time to start inserting hard drives. As i described in the overview... I'm going to be installing one 160gb hard drive to hold the operating system and applications as well as four-500 gb hard drives that are going to be setup as a RAID array and used for file storage.
Here's a picture showing the hard drives placed in the case. (the top one I had to place in a slot not generally used for hard drives... it still worked fine though)
Now it's time to start on connections. I urge you to refer to your motherboard instructions for specific instructions on how to setup all the connections.
I first connected the cables leading to the front power-button, USB connections, and indicator LEDs. These generally go in / near the F_panel.
Then it was time to start connecting all the SATA (and my one non-SATA device, the floppy drive). The picture probably doesn't do this justice but it should be relatively self explanatory. Find your SATA ports on your motherboard and connect them to your various SATA devices (in my case the 5 hard drives and the CD/DVD drive) via SATA cables. As a side note... my motherboard only came with 4 SATA cables for the 6 SATA slots it has, so I had to pick up two additional cables.
I also connected power cables to all the various devices, including the hard drives, floppy and CD/DVD drives, motherboard and fan.
Once all your connections are established, you're ready to fire it up and test it out. I recommend leaving the case off for a bit because you'll need to go back in and unplug things later in this tutorial. Also if you messed up any of the connections, you can get back in faster to fix them.
Here's a picture of the finished case sitting next to my sub woofer. (complete with stickers - though I'm still waiting on my ubuntu stickers)
Here's a picture of my entertainment center with its latest addition (bottom right). Sorry it's kinda dark.
Continued: Operating System & Hard Drive Configuration
Auto-startup of LIRC and Elisa
The next thing I wanted to do was have all of this startup by itself when I turn on my computer. That meant making the media-user auto-login, getting LIRC to start up and then getting Elisa to start up... all automatically.
First I made it so my media-user logs in automatically at startup. I believe you can access this screen in the System menu somewhere, but the location escapes me.
So I did it this way, open a terminal and type:
sudo gdmsetup
This will bring up a window with login preferences. Select the security tab, check "Enable automatic Login" and select the media-user.
Now your media-user will auto-login when the system boots. You can always change users once you're logged in if you would like, but I just use my remote connection instead and leave the media-user logged in all the time.
The next step is to get LIRC to start up automatically. Because the command to start LIRC requires root access (sudo), you need to give yourself permission to execute the command without a password.
To do this, type the following in the terminal:
export EDITOR=gedit && sudo visudo
Change the DEFAULTs line to be:
'Defaults !lecture,tty_tickets,!fqdn,env_keep+="DISPLAY HOME"
At the very end of the file, add the following line (replacing username with your username)
username ALL = NOPASSWD: /etc/init.d/lirc start
Save and Exit.
Now go to system -> preferences -> sessions and add a new startup program. Name it LIRC or something and give it a description if you'd like. For the command use:
sudo /etc/init.d/lirc start
Now the LIRC utility will start (enabling your remote control)
In order for elisa to start automatically, you have to also add it to the session -> startup programs. However, if you just type elisa in there, it will startup before your lirc gets a chance to start up, and the remote wont work.
There may be a better way to do this, but this way works and its easy.
I wrote a simple bash script 'elisa-start' in my media-user's home directory.
vi ~/elisa-start
Add the following in the file:
#/bin/bash/
sleep 15 && elisa
This script, when executed, will wait about 15 seconds, and then execute Elisa. I don't recommend going much faster than 15 or elisa boots before LIRC initializes.
To modify the permissions on the file so everyone can access / execute the file, type:
sudo chmod 777 /home/username/elisa-start
Now go back to system -> preferences -> sessions and add another new program. Call it elisa and add a description if you'd like. For the command use (replacing username with your media-user's name):
/home/username/elisa-start
That should do it. You can try restarting X (ctrl - alt - backspace) to test if the LIRC + Elisa startup works correctly, or you can restart the computer to make sure the user auto-logs in and the LIRC and Elisa start-ups work.
Thats it! You're done! Have fun!
First I made it so my media-user logs in automatically at startup. I believe you can access this screen in the System menu somewhere, but the location escapes me.
So I did it this way, open a terminal and type:
sudo gdmsetup
This will bring up a window with login preferences. Select the security tab, check "Enable automatic Login" and select the media-user.
Now your media-user will auto-login when the system boots. You can always change users once you're logged in if you would like, but I just use my remote connection instead and leave the media-user logged in all the time.
The next step is to get LIRC to start up automatically. Because the command to start LIRC requires root access (sudo), you need to give yourself permission to execute the command without a password.
To do this, type the following in the terminal:
export EDITOR=gedit && sudo visudo
Change the DEFAULTs line to be:
'Defaults !lecture,tty_tickets,!fqdn,env_keep+="DISPLAY HOME"
At the very end of the file, add the following line (replacing username with your username)
username ALL = NOPASSWD: /etc/init.d/lirc start
Save and Exit.
Now go to system -> preferences -> sessions and add a new startup program. Name it LIRC or something and give it a description if you'd like. For the command use:
sudo /etc/init.d/lirc start
Now the LIRC utility will start (enabling your remote control)
In order for elisa to start automatically, you have to also add it to the session -> startup programs. However, if you just type elisa in there, it will startup before your lirc gets a chance to start up, and the remote wont work.
There may be a better way to do this, but this way works and its easy.
I wrote a simple bash script 'elisa-start' in my media-user's home directory.
vi ~/elisa-start
Add the following in the file:
#/bin/bash/
sleep 15 && elisa
This script, when executed, will wait about 15 seconds, and then execute Elisa. I don't recommend going much faster than 15 or elisa boots before LIRC initializes.
To modify the permissions on the file so everyone can access / execute the file, type:
sudo chmod 777 /home/username/elisa-start
Now go back to system -> preferences -> sessions and add another new program. Call it elisa and add a description if you'd like. For the command use (replacing username with your media-user's name):
/home/username/elisa-start
That should do it. You can try restarting X (ctrl - alt - backspace) to test if the LIRC + Elisa startup works correctly, or you can restart the computer to make sure the user auto-logs in and the LIRC and Elisa start-ups work.
Thats it! You're done! Have fun!
Setting up a Remote Connection
One piece of functionality I wanted was the ability to log in remotely and run applications while I'm watching a video in Elisa.
The first step to this process was creating an additional user, which is pretty self explanatory. Basically I will have two users, a remote-user, which I will use for running applications, downloading, surfing the net, or whatever else; and a media-user, which will run Elisa.
So to create another user go to System -> Administration -> Users and Groups and add a new user. Make sure to make this user an administrator.
Now that you have two users, the next step is to install NX server. This will serve as a Remote Desktop server that you can connect to from any other machine that has the client installed.
Before you install NX Server, make sure to install ssh first:
sudo apt-get install openssh-server
To install nx server, visit the following web site:
http://www.nomachine.com/download-package.php?Prod_Id=5
You'll need to install the client, node, and server (in that order) on the host machine. Click the download buttons to download and install each of the programs.
To start the service, just enter the following in the terminal:
sudo /usr/NX/bin/nxserver --start
That should do it. The service should automatically start itself in the event of a reboot / shutdown.
To connect to your machine from another computer, go to the same web site on the other computer and download just the NX Client.
If you're setting this up on a laptop, I recommend setting up two connections, one to be used when you're home and on the same LAN, and one to be used when you're away from home.
Open the client and the connection wizard will pop up. To setup the home connection, type in a name for the connection (can be anything), for the host, type in the local IP address (generally 192.168.1.???), leave the port at 22 (unless you changed it), and select LAN for the connection type. Save the connection and when the login screen comes up, enter the login / password information for the remote-user you created on your media center PC.
To setup an away-from-home connection, open the client again to see the connection wizard. Again type in a name for the connection, the IP address of the computer (you may have to look this up as most people have dynamic IP addresses - there is an alternative method I will discuss in a minute), leave the port as is, and select ASDL (most likely) for your connection type. Save the connection. You will again be prompted for login information and again enter the login / password for the remote-user on your media center PC.
The alternative to using an IP address (which often changes) in the above step is to use a dynamic DNS service. I use no-ip's free ManagedDNS service: http://www.no-ip.com/services/managed_dns/free_dynamic_dns.html
Register for this free service from your home network, and you won't have to remember your IP address anymore. You can select a user name and a domain name (like 'myuser.no-ip.org') and can enter that instead of the IP address in the above step. Just make sure to forward port 22 in your router to the correct local machine. (this means using a static IP address on your local network). This will also work for ftp-servers or web servers or whatever. It basically is a domain configured to route traffic to your router. When you type in a port, your router will forward it to whatever machine you've specified in your router settings.
Continued: Auto-startup of LIRC and Elisa
The first step to this process was creating an additional user, which is pretty self explanatory. Basically I will have two users, a remote-user, which I will use for running applications, downloading, surfing the net, or whatever else; and a media-user, which will run Elisa.
So to create another user go to System -> Administration -> Users and Groups and add a new user. Make sure to make this user an administrator.
Now that you have two users, the next step is to install NX server. This will serve as a Remote Desktop server that you can connect to from any other machine that has the client installed.
Before you install NX Server, make sure to install ssh first:
sudo apt-get install openssh-server
To install nx server, visit the following web site:
http://www.nomachine.com/download-package.php?Prod_Id=5
You'll need to install the client, node, and server (in that order) on the host machine. Click the download buttons to download and install each of the programs.
To start the service, just enter the following in the terminal:
sudo /usr/NX/bin/nxserver --start
That should do it. The service should automatically start itself in the event of a reboot / shutdown.
To connect to your machine from another computer, go to the same web site on the other computer and download just the NX Client.
If you're setting this up on a laptop, I recommend setting up two connections, one to be used when you're home and on the same LAN, and one to be used when you're away from home.
Open the client and the connection wizard will pop up. To setup the home connection, type in a name for the connection (can be anything), for the host, type in the local IP address (generally 192.168.1.???), leave the port at 22 (unless you changed it), and select LAN for the connection type. Save the connection and when the login screen comes up, enter the login / password information for the remote-user you created on your media center PC.
To setup an away-from-home connection, open the client again to see the connection wizard. Again type in a name for the connection, the IP address of the computer (you may have to look this up as most people have dynamic IP addresses - there is an alternative method I will discuss in a minute), leave the port as is, and select ASDL (most likely) for your connection type. Save the connection. You will again be prompted for login information and again enter the login / password for the remote-user on your media center PC.
The alternative to using an IP address (which often changes) in the above step is to use a dynamic DNS service. I use no-ip's free ManagedDNS service: http://www.no-ip.com/services/managed_dns/free_dynamic_dns.html
Register for this free service from your home network, and you won't have to remember your IP address anymore. You can select a user name and a domain name (like 'myuser.no-ip.org') and can enter that instead of the IP address in the above step. Just make sure to forward port 22 in your router to the correct local machine. (this means using a static IP address on your local network). This will also work for ftp-servers or web servers or whatever. It basically is a domain configured to route traffic to your router. When you type in a port, your router will forward it to whatever machine you've specified in your router settings.
Continued: Auto-startup of LIRC and Elisa
Setting up the Remote Control (LIRC)
Now I want to setup a remote control to navigate through Elisa instead of using the mouse. I chose the standard windows media remote control and receiver because it is one of the most supported remotes available.
For a list of supported remotes, visit: http://www.lirc.org/
Plug in the receiver for the remote control (usually USB).
The following information is available from this tutorial for installing LIRC on Ubuntu (Gutsy): https://help.ubuntu.com/community/InstallLirc/Gutsy)
Install lirc by opening a terminal and typing:
DEBIAN_FRONTEND=gnome sudo apt-get install lirc
After the install, you can test the remote by typing 'irw' in the terminal. This will appear to make the terminal "hang".
Press buttons on the remote control. You should see them come up on in the terminal. To end testing, hit 'ctrl-c'.
Now you need to map the buttons on your remote control to the application you're using.
Install the button mappings application which will generate mapping files (lircrc files) for MythTV, Xine, MPlayer, VLC, Totem, & Elisa by running:
sudo apt-get install mythbuntu-lirc-generator
I used the following command to generate just the elisa lircrc file in the current directory.
mythbuntu-lircrc-generator -l ./elisa.lirc --mythtv 0 --mythtv_lircrc 0 --mplayer 0 --totem 0 --xine 0 --vlc 0 --xmame 0 --xmess 0
I posted the file I used here if you want to use that instead of generating one.
If you want to generate all the lircrc files for the above applications, run this instead:
mythbuntu-lircrc-generator
Copy the generated elisa lircrc file (I renamed mine to elisa.lirc) to this directory:
/usr/lib/python2.5/site-packages/elisa/plugins/lirc_plugin/data/lirc
Edit the lirc_input section of the elisa.conf file (in ~/.elisa/) so it looks like this:
[lirc:lirc_input]
# filename of the LIRC config map to use
lirc_rc = 'elisa.lirc'
You also need to start the LIRC application by running:
sudo /etc/init.d/lirc start
Now to test it out... Start up Elisa and try navigating through the menus with your remote control.
Continued: Setting up a Remote Connection
For a list of supported remotes, visit: http://www.lirc.org/
Plug in the receiver for the remote control (usually USB).
The following information is available from this tutorial for installing LIRC on Ubuntu (Gutsy): https://help.ubuntu.com/community/InstallLirc/Gutsy)
Install lirc by opening a terminal and typing:
DEBIAN_FRONTEND=gnome sudo apt-get install lirc
After the install, you can test the remote by typing 'irw' in the terminal. This will appear to make the terminal "hang".
Press buttons on the remote control. You should see them come up on in the terminal. To end testing, hit 'ctrl-c'.
Now you need to map the buttons on your remote control to the application you're using.
Install the button mappings application which will generate mapping files (lircrc files) for MythTV, Xine, MPlayer, VLC, Totem, & Elisa by running:
sudo apt-get install mythbuntu-lirc-generator
I used the following command to generate just the elisa lircrc file in the current directory.
mythbuntu-lircrc-generator -l ./elisa.lirc --mythtv 0 --mythtv_lircrc 0 --mplayer 0 --totem 0 --xine 0 --vlc 0 --xmame 0 --xmess 0
I posted the file I used here if you want to use that instead of generating one.
If you want to generate all the lircrc files for the above applications, run this instead:
mythbuntu-lircrc-generator
Copy the generated elisa lircrc file (I renamed mine to elisa.lirc) to this directory:
/usr/lib/python2.5/site-packages/elisa/plugins/lirc_plugin/data/lirc
Edit the lirc_input section of the elisa.conf file (in ~/.elisa/) so it looks like this:
[lirc:lirc_input]
# filename of the LIRC config map to use
lirc_rc = 'elisa.lirc'
You also need to start the LIRC application by running:
sudo /etc/init.d/lirc start
Now to test it out... Start up Elisa and try navigating through the menus with your remote control.
Continued: Setting up a Remote Connection
Setting up Elisa Media Center
First add the Elisa to your software sources.
There's a page with the different sources here: https://code.fluendo.com/elisa/trac/wiki/Packages
Go to System -> Administration -> Software Sources and click on the Third Party Software tab. Click Add and enter (for Gutsy):
sudo apt-get install elisa-extra
or
sudo apt-get install elisa
I recommend getting elisa-extra as it has some extra plugins etc... After it's done installing, it will be ready to run by going to Applications -> Sound & Video -> Elisa Media Center, or just typing Elisa in the terminal.
By default, Elisa uses the audio / video / image folders in your home directory as your media library. If you're like me and want to use a different location, like the RAID array you just setup, you can modify the elisa.conf file to add additional locations. The elisa.conf file is located in /.elisa/ directory in your home directory. Before editing this, you should close elisa (hit escape).
To edit elisa.conf:
sudo vi ~/.elisa/elisa.conf
I configured elisa.conf to include additional media locations. There's a simple explanation on the elisa wiki site at: https://code.fluendo.com/elisa/trac/wiki/FirstRun
My modifications look like this. I modified the locations_builder section as follows:
[xmlmenu:locations_builder]
locations = ['file:///mnt/raid/movies','file:///mnt/raid/audio', 'file:///mnt/raid/images']
auto_locations = 0
[[file:///mnt/raid/movies]]
label = 'Movies'
only_media = ['video']
location_type = 'local'
[[file:///mnt/raid/audio]]
label = 'Music'
only_media = ['audio']
location_type = 'local'
[[file:///mnt/raid/images]]
label = 'Pictures'
only_media = ['image']
location_type = 'local'
The locations line is where you add the folders you'd like to include in your media library. I also set auto_locations to 0 so it doesn't try to search for additional media. The next three sections, which are named after each of the locations I added, provide some additional detail for each location. The label is simply the name that will be displayed for that folder in Elisa. You can restrict in which section that folder will appear in the field 'only_media'. My movies directory, for example, will only show up under Videos in Elisa. The location_type should be set to local unless you are attempting to access a networked location.
At this point, you should be able to run Elisa, go into the different categories (Music, Video, Images) and see your folders.
Continued: Setting up the Remote Control (LIRC)
There's a page with the different sources here: https://code.fluendo.com/elisa/trac/wiki/Packages
Go to System -> Administration -> Software Sources and click on the Third Party Software tab. Click Add and enter (for Gutsy):
deb http://elisa.fluendo.com/packages gutsy main
Then you need to add the key... open a terminal and enter:
wget http://elisa.fluendo.com/packages/philn.asc -O - | sudo apt-key add -
Next do an update:
sudo apt-get update
Now you're ready to install elisa. In the terminal type:
Then you need to add the key... open a terminal and enter:
wget http://elisa.fluendo.com/packages/philn.asc -O - | sudo apt-key add -
Next do an update:
sudo apt-get update
Now you're ready to install elisa. In the terminal type:
sudo apt-get install elisa-extra
or
sudo apt-get install elisa
I recommend getting elisa-extra as it has some extra plugins etc... After it's done installing, it will be ready to run by going to Applications -> Sound & Video -> Elisa Media Center, or just typing Elisa in the terminal.
By default, Elisa uses the audio / video / image folders in your home directory as your media library. If you're like me and want to use a different location, like the RAID array you just setup, you can modify the elisa.conf file to add additional locations. The elisa.conf file is located in /.elisa/ directory in your home directory. Before editing this, you should close elisa (hit escape).
To edit elisa.conf:
sudo vi ~/.elisa/elisa.conf
I configured elisa.conf to include additional media locations. There's a simple explanation on the elisa wiki site at: https://code.fluendo.com/elisa/trac/wiki/FirstRun
My modifications look like this. I modified the locations_builder section as follows:
[xmlmenu:locations_builder]
locations = ['file:///mnt/raid/movies','file:///mnt/raid/audio', 'file:///mnt/raid/images']
auto_locations = 0
[[file:///mnt/raid/movies]]
label = 'Movies'
only_media = ['video']
location_type = 'local'
[[file:///mnt/raid/audio]]
label = 'Music'
only_media = ['audio']
location_type = 'local'
[[file:///mnt/raid/images]]
label = 'Pictures'
only_media = ['image']
location_type = 'local'
The locations line is where you add the folders you'd like to include in your media library. I also set auto_locations to 0 so it doesn't try to search for additional media. The next three sections, which are named after each of the locations I added, provide some additional detail for each location. The label is simply the name that will be displayed for that folder in Elisa. You can restrict in which section that folder will appear in the field 'only_media'. My movies directory, for example, will only show up under Videos in Elisa. The location_type should be set to local unless you are attempting to access a networked location.
At this point, you should be able to run Elisa, go into the different categories (Music, Video, Images) and see your folders.
Continued: Setting up the Remote Control (LIRC)
Setting up the RAID Array
Start by installing mdadm. Open a terminal and type:
sudo apt-get install mdadm
Once this is installed, run 'cfdisk' in the terminal to setup partitions on the RAID disks. For each hard drive that will be included in the RAID array (NOT the disk with the OS already installed), use the following partition settings:
*NOTE* each disk must have the same partition size
- use 1 primary partition, entire size of disk
- Type: 'FD' - Linux RAID autodetect
At this point you're ready to create the array.
Use the following command to create the array, which will be called /dev/md0. (replacing the number of raid-devices with the number of disks you're using and the list of hard drives at the end with your disks)
sudo mdadm --create --verbose /dev/md0 --level=5 --raid-devices=4 /dev/sda1 /dev/sdb1 /dev/sdc1 /dev/sdd1
This will start a 'syncing' process that you can monitor with the following command:
cat /proc/mdstat
Stop at this point! Keep running the above command periodically until resyncing is complete. It usually gives you an estimated time left. Once the resync is complete, continue...
Now you need to format the array. Run the following command to format /dev/md0:
sudo mkfs.ext3 /dev/md0
Once this is done, you need to create the config file.
Run the following command to create this file:
sudo mdadm --detail --scan --verbose > /etc/mdadm/mdadm.conf
You're almost there, the next step is to create a mount point for the RAID array. This is the physical location you will access your array and can be located almost anywhere. I made mine at /mnt/raid/.
First create a directory for the mount point:
sudo mkdir /mnt/raid/
Next you need to edit the fstab file to ensure the array will be mounted automatically on boot. To edit the file, run either:
sudo vi /etc/fstab
or
sudo gedit /etc/fstab
I would recommend the latter if you're not familiar with vi editing.
Insert the following line into the fstab file: (replacing my mount point with the one you used)
/dev/md0 /mnt/raid/ ext3 defaults 1 2
You should also comment out any lines referring to any of the drives that make up the array.
Now you just need to mount the new RAID array. Run:
sudo mount /dev/md0 /mnt/raid/
And you're done! The RAID is now setup and available at the mount point (/mnt/raid/ or whatever mount point you used) When you navigate to this directory (I setup a shortcut to it on my desktop), you'll notice the available space in the window status bar. I ended up with 1.37 TB's of space available in my RAID-5 array, which doesn't include the disk space available on the disk containing Ubuntu.
Continued: Setting up Elisa Media Center
sudo apt-get install mdadm
Once this is installed, run 'cfdisk' in the terminal to setup partitions on the RAID disks. For each hard drive that will be included in the RAID array (NOT the disk with the OS already installed), use the following partition settings:
*NOTE* each disk must have the same partition size
- use 1 primary partition, entire size of disk
- Type: 'FD' - Linux RAID autodetect
At this point you're ready to create the array.
Use the following command to create the array, which will be called /dev/md0. (replacing the number of raid-devices with the number of disks you're using and the list of hard drives at the end with your disks)
sudo mdadm --create --verbose /dev/md0 --level=5 --raid-devices=4 /dev/sda1 /dev/sdb1 /dev/sdc1 /dev/sdd1
This will start a 'syncing' process that you can monitor with the following command:
cat /proc/mdstat
Stop at this point! Keep running the above command periodically until resyncing is complete. It usually gives you an estimated time left. Once the resync is complete, continue...
Now you need to format the array. Run the following command to format /dev/md0:
sudo mkfs.ext3 /dev/md0
Once this is done, you need to create the config file.
Run the following command to create this file:
sudo mdadm --detail --scan --verbose > /etc/mdadm/mdadm.conf
You're almost there, the next step is to create a mount point for the RAID array. This is the physical location you will access your array and can be located almost anywhere. I made mine at /mnt/raid/.
First create a directory for the mount point:
sudo mkdir /mnt/raid/
Next you need to edit the fstab file to ensure the array will be mounted automatically on boot. To edit the file, run either:
sudo vi /etc/fstab
or
sudo gedit /etc/fstab
I would recommend the latter if you're not familiar with vi editing.
Insert the following line into the fstab file: (replacing my mount point with the one you used)
/dev/md0 /mnt/raid/ ext3 defaults 1 2
You should also comment out any lines referring to any of the drives that make up the array.
Now you just need to mount the new RAID array. Run:
sudo mount /dev/md0 /mnt/raid/
And you're done! The RAID is now setup and available at the mount point (/mnt/raid/ or whatever mount point you used) When you navigate to this directory (I setup a shortcut to it on my desktop), you'll notice the available space in the window status bar. I ended up with 1.37 TB's of space available in my RAID-5 array, which doesn't include the disk space available on the disk containing Ubuntu.
Continued: Setting up Elisa Media Center
Operating System & Hard Drive Configuration
This tutorial starts where the hardware installation leaves off...
Connect the hard drive that will contain the Operating System (and make sure the hard drives that will be in RAID are disconnected to simplify things).
Boot the system with the Ubuntu Live CD and follow the instructions to install Ubuntu.
After installing the Operating System and optionally installing any suggested updates, turn the computer off.
Connect the hard drives that will be setup in the RAID array. You have some choices at this point. You first need to decide whether to do a hardware or a software RAID. I chose software because it is easier to setup with Ubuntu and if I want to migrate the RAID array to another machine later, I just need to install the same software (as opposed to a hardware RAID where you would need the exact same motherboard). There are benefits to both types. Once you've made that decision, you should decide what RAID level you want to use.
In general, RAID-1+0 (or RAID-10) is accepted as the best RAID level available. This type of array offers exceptional failure-recovery while still maintaining a high level of performance. The only downside of RAID-10 is that it requires at least 4 drives and requires that half of them are used for parity. So in my case, using four, 500gb hard drives for the array, only two of them would be usable space, leaving me with around 900 gb's of usable space.
If you're like me and don't really like the idea of buying almost 2 TB's worth of space to only get 900 gb's out of it, I would suggest using RAID-5. There are some disadvantages to this RAID level. For one, array recovery is a little more challenging in RAID-5 compared to RAID-10 should you experience a failure. Also, small disk-writes will be faster in RAID-10 compared to RAID-5 (as you're writing to 3 disks for every write in RAID-5 compared to 2 in RAID-10). However, since I'm essentially just going to be downloading and playing media, I'm not overly concerned with these small performance differences. If you were using the array for more heavy-computing, I would suggest RAID-10.
So in summary, I chose a software, RAID-5 array. Moving on...
You may have to modify your hard drive boot order settings in the BIOS at this point to ensure your hard drive with the Operating System will try to boot first. Generally the hard drive boot order settings are in the Advanced Options in the BIOS. Move the hard drive with Ubuntu loaded on it to the top of the list, save and exit.
Boot up and log into Ubuntu.
Continued: Setting up the RAID Array
Connect the hard drive that will contain the Operating System (and make sure the hard drives that will be in RAID are disconnected to simplify things).
Boot the system with the Ubuntu Live CD and follow the instructions to install Ubuntu.
After installing the Operating System and optionally installing any suggested updates, turn the computer off.
Connect the hard drives that will be setup in the RAID array. You have some choices at this point. You first need to decide whether to do a hardware or a software RAID. I chose software because it is easier to setup with Ubuntu and if I want to migrate the RAID array to another machine later, I just need to install the same software (as opposed to a hardware RAID where you would need the exact same motherboard). There are benefits to both types. Once you've made that decision, you should decide what RAID level you want to use.
In general, RAID-1+0 (or RAID-10) is accepted as the best RAID level available. This type of array offers exceptional failure-recovery while still maintaining a high level of performance. The only downside of RAID-10 is that it requires at least 4 drives and requires that half of them are used for parity. So in my case, using four, 500gb hard drives for the array, only two of them would be usable space, leaving me with around 900 gb's of usable space.
If you're like me and don't really like the idea of buying almost 2 TB's worth of space to only get 900 gb's out of it, I would suggest using RAID-5. There are some disadvantages to this RAID level. For one, array recovery is a little more challenging in RAID-5 compared to RAID-10 should you experience a failure. Also, small disk-writes will be faster in RAID-10 compared to RAID-5 (as you're writing to 3 disks for every write in RAID-5 compared to 2 in RAID-10). However, since I'm essentially just going to be downloading and playing media, I'm not overly concerned with these small performance differences. If you were using the array for more heavy-computing, I would suggest RAID-10.
So in summary, I chose a software, RAID-5 array. Moving on...
You may have to modify your hard drive boot order settings in the BIOS at this point to ensure your hard drive with the Operating System will try to boot first. Generally the hard drive boot order settings are in the Advanced Options in the BIOS. Move the hard drive with Ubuntu loaded on it to the top of the list, save and exit.
Boot up and log into Ubuntu.
Continued: Setting up the RAID Array
Tutorial Overview
I'm putting together a tutorial for building / installing / and configuring a linux-media-box. The system will be using a hard drive containing the Operating System (Ubuntu - Gutsy) as well as 4 additional hard drives setup in RAID-5.
Basically what I wanted to do was have a media-box using my TV as its monitor. The media-box will use Elisa as a media center front end with a M$ media remote control to navigate. I also wanted to have a user I could remote into from my laptop and run applications "behind the scenes" while the media center was running on the TV.
So here's how to make all that happen!
Here's a list of the hardware that was used:
The tutorial was broken up into the following sections:
So let's get started: Hardware Assembly & Installation
Basically what I wanted to do was have a media-box using my TV as its monitor. The media-box will use Elisa as a media center front end with a M$ media remote control to navigate. I also wanted to have a user I could remote into from my laptop and run applications "behind the scenes" while the media center was running on the TV.
So here's how to make all that happen!
Here's a list of the hardware that was used:
- 1x - GIGABYTE GA-M57SLI-S4 rev. 2.0 Socket AM2 NVIDIA nForce 570 SLI MCP ATX AMD Motherboard
- 1x - AMD Athlon 64 X2 4800+ Brisbane 2.5GHz 2 x 512KB L2 Socket AM2 Processor
- 4x - Western Digital Caviar SE16 500GB 7200 RPM 16MB Cache SATA 3.0Gb/s Hard Drive
- 1x - Western Digital Caviar SE 160GB 7200 RPM 8MB Cache SATA 3.0Gb/s Hard Drive
- 1x - Thermaltake Wing RS 101 Black / Silver ATX Mid Tower PC Case with 430W Power Supply
- 2x - Patriot Signature 1GB DDR2-800 CL 5 Desktop Memory
- 1x -EVGA nVidia GeForce 8500GT 256MB DVI/HDCP PCI-Express Video Card
- 1x - SAMSUNG Black 20X DVD+R 8X DVD+RW 12X DVD+R DL 20X DVD-R 6X DVD-RW 12X DVD-RAM 16X DVD-ROM 48X CD-R 32X CD-RW 48X CD-ROM 2MB Cache SATA DVD±R Burner
- 1x - SONY Black 1.44MB 3.5" Internal Floppy Drive Model MPF920 Black
- 1x - Microsoft Media Remote & Receiver
The tutorial was broken up into the following sections:
- Hardware Assembly and Installation
- Operating System & Hard Drive Configuration
- Setting up the RAID Array
- Setting up Elisa Media Center
- Setting up the Remote Control (LIRC)
- Setting up a Remote Connection
- Auto-startup of LIRC and Elisa
So let's get started: Hardware Assembly & Installation
Subscribe to:
Posts (Atom)